

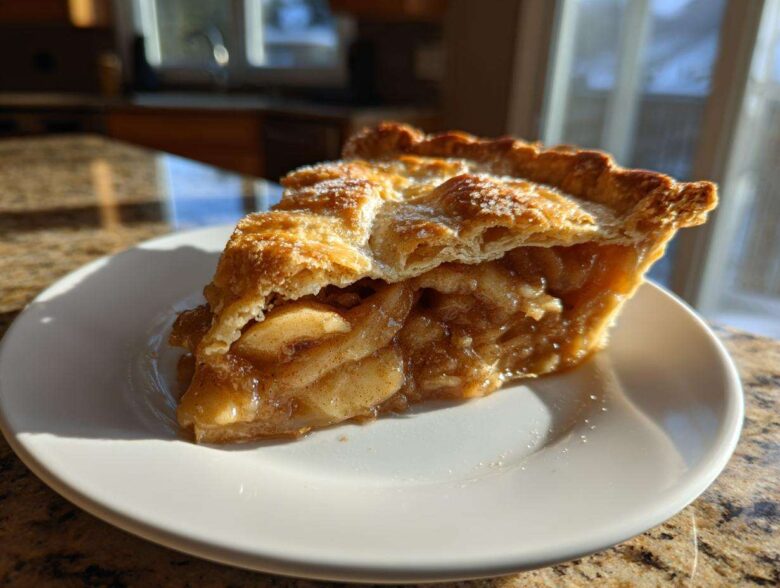
Oh, listen, if there is one single dessert that just screams ‘home’ and ‘comfort’ and ‘I know what I’m doing in the kitchen,’ it’s a seriously stellar apple pie. Forget the sad, soggy crusts you’ve had elsewhere! This is it—the one you need. I spent practically my entire twenties trying to crack the code on that elusive, shatteringly flaky double crust, and when I finally figured out the magic of keeping everything colder than an arctic morning, everything changed. Trust me when I say this apple pie recipe is the goldilocks of baking: the crust is perfectly buttery, and the spiced apple filling sings without being too mushy. It’s tradition in a pastry shell, people!
Why This Is the Ultimate apple pie recipe for Beginners and Experts
What makes this recipe so reliable—whether you’re a baking newbie or you bake pies every Sunday—is that we aren’t cutting corners on the essentials. It all boils down to two things that work together perfectly. First, the crust. We treat that butter like gold and keep it freezing cold. That’s how you get those beautiful, distinct flakes that separate when you cut into it. No one wants a tough pie shell, right?
Second, the filling just sings! We’re hitting that perfect sweet spot with the spices. It’s not just cinnamon; we toss in a little nutmeg and allspice for depth. This combination turns what could be a simple fruit dessert into the ultimate comfort food dessert. Seriously, making this easy homemade apple pie from scratch is far less intimidating than you think once you understand the science behind those two main components.
Key Components of a Perfect apple pie recipe
Every amazing pie rests on two foundational elements that we nail down here. You absolutely need that gorgeous, yielding, buttery pie crust, which acts like the perfect frame. Then, you need the heart of the pie: the intensely flavorful, slightly tart, and aromatic cinnamon spiced apples filling. Get these two right, and success is guaranteed. Now, let’s look at just what you need to have on hand before we start mixing!
Ingredients Needed for Your apple pie recipe
Okay, gather your supplies! Remember, this isn’t the time to mess around with subpar ingredients, especially when we’re aiming for that amazing, shatteringly flaky crust. If you can swing it, buy the best unsalted butter you can find—the butter is what carries the flavor in the crust, after all! We’re dividing these ingredients into two essential groups: what makes the pastry magic happen, and what makes the filling taste like heaven poured over a slice of nostalgia.
For the Flaky Double Crust
This dough only uses four things, but the temperature of that butter is everything. Seriously, it must be cold!
- 2 1/2 cups all-purpose flour
- 1 teaspoon salt
- 1 cup (2 sticks) unsalted butter, cold and cubed
- 1/2 cup ice water
For the Cinnamon Spiced Apples Filling
For the apples, I insist on Granny Smiths! They hold their shape beautifully and give you the necessary tartness to balance all that sugar. If you want to keep this as a true from scratch apple pie experience, measuring your spices matters quite a bit.
- 6 medium Granny Smith apples, peeled, cored, and sliced 1/4 inch thick
- 1/2 cup granulated sugar
- 1/4 cup packed light brown sugar
- 1 tablespoon all-purpose flour (this thickens everything up!)
- 1 teaspoon ground cinnamon
- 1/4 teaspoon ground nutmeg
- 1/8 teaspoon ground allspice
- 1 tablespoon lemon juice
- 1 large egg, beaten (for egg wash)
- 1 tablespoon coarse sugar (for sprinkling on top)
Step-by-Step Instructions for the Best apple pie recipe
Alright, deep breaths! This is where the magic happens, and I promise you, following these simple apple pie instructions results in true traditional baked pies, the kind that make people gasp when you bring them to the table. We tackle the crust foundation first, then we load it up with those gorgeous, spice-coated apples. Speed and cold temperatures are your best friends here!
Making the Flaky Pie Crust Tutorial
First things first: your butter and water need to be absolutely ice cold. If the butter melts before it hits the oven, you’ll end up with pastry instead of pastry, you know? Whisk the flour and salt together, then grab your pastry blender—or just use your fingertips if you only have your hands!—and cut in that cold butter until you see pieces about the size of little peas. Don’t try to make it uniform! Those buttery clumps are what create steam pockets when they bake, which is the entire secret to flakiness.
Next, dribble in the ice water, just a tablespoon at a time, stirring gently with a fork until the dough *just* clumps. Stop immediately! You shouldn’t have dry pockets, but it shouldn’t feel sticky or wet either. Divide it into two disks, wrap them tight, and send them to the fridge for at least an hour. Chilling keeps the butter solid, and that solid butter equals flaky crust—it cannot melt and incorporate into the flour before baking, or you lose all that precious separation!
Assembling the apple pie recipe
Preheat that oven to 425 degrees F; we want a hot start! Take one disk out and roll it on a lightly floured surface until it’s about 12 inches across. Carefully drape it into your standard 9-inch pie plate, letting the edges hang over a bit. Now, pile in that glorious mound of best apple pie filling! Make sure those apples are evenly distributed.
Roll out the second disk for the top. Lay it gently over your apples. Now, seal the deal! Crimp those top and bottom edges together—get creative or just press them tightly with a fork. But listen, you HAVE to cut four or five slits in the top crust. That steam has to escape, or your pie shell will explode messily across your oven!
For that gorgeous golden sheen—that’s the egg wash, folks. Brush the whole top gently, and then sprinkle on that coarse sugar for a little crunch. It makes all the difference!
Baking and Cooling Your Traditional Baked Pies
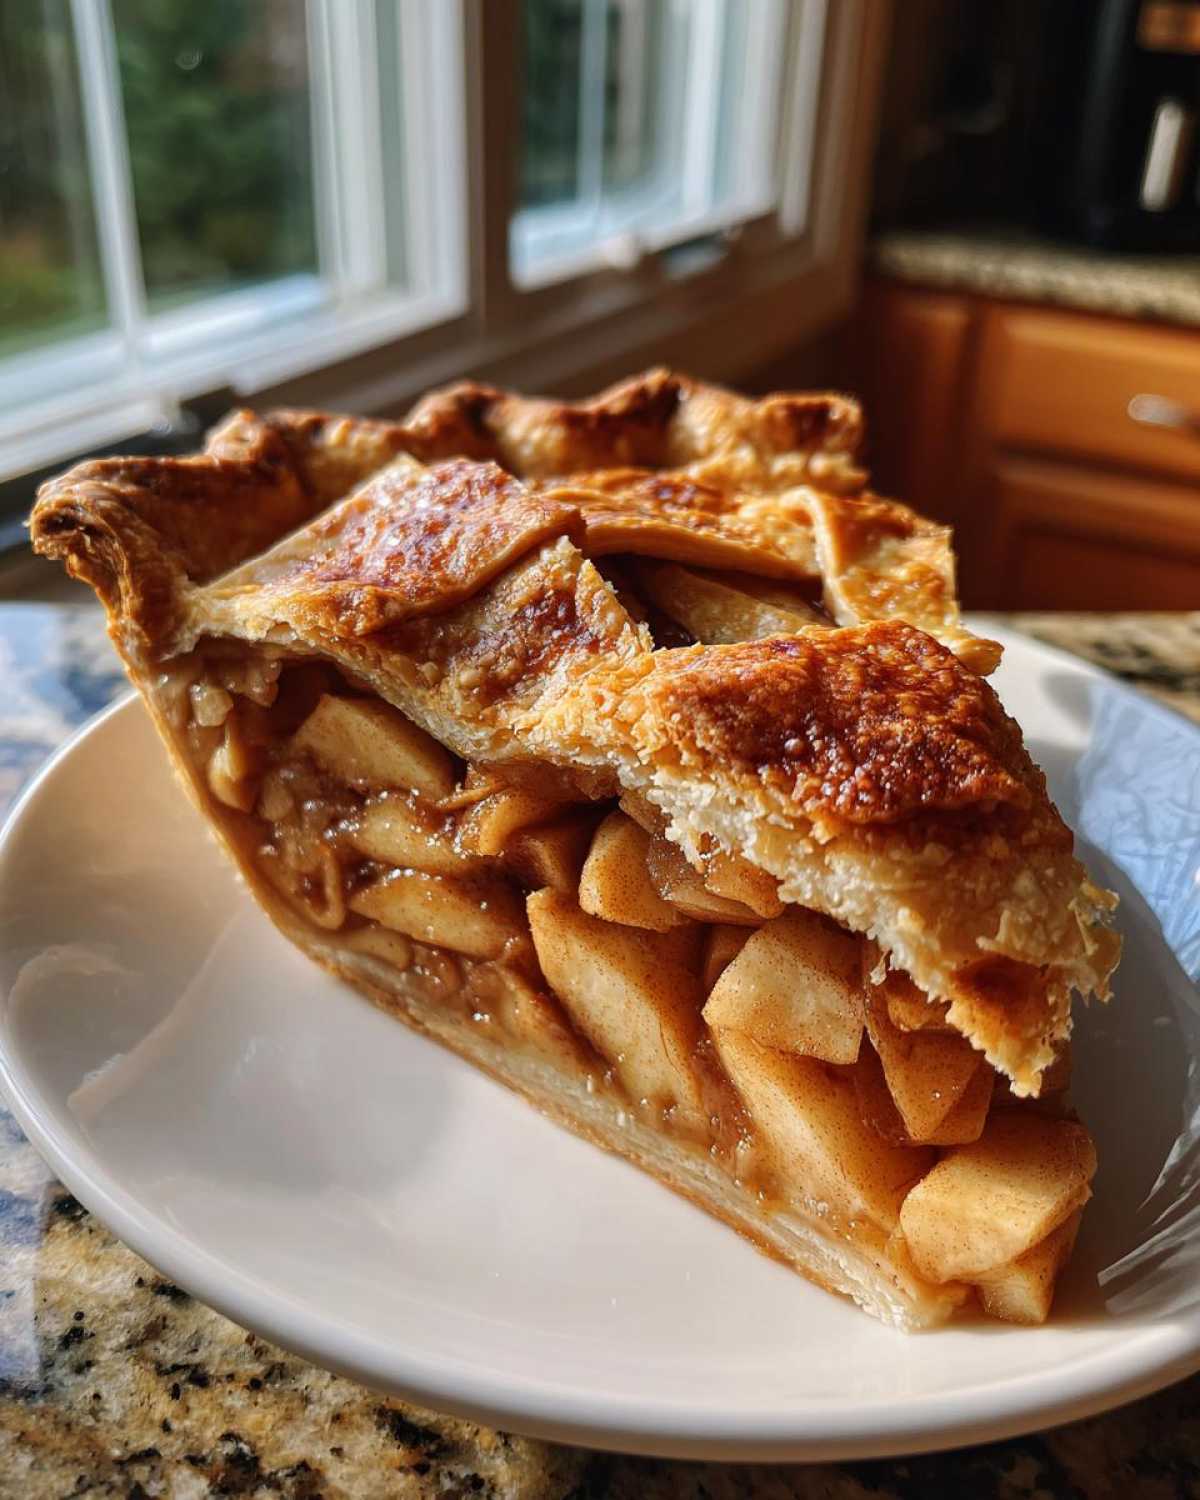
Get it in that hot oven! Bake at 425 degrees F for 15 minutes straight. That high heat sets the crust structure fast. After 15 minutes, you must drop the temperature down to 375 degrees F. Then, let it bake for another 40 to 50 minutes. Keep an eye on those edges; if they start looking too dark too fast, cover them loosely with some foil. You want that filling to be bubbly and the crust deeply golden brown.
Here is the hardest part about making traditional baked pies: patience! Once it comes out, you absolutely must let it cool on a wire rack for at least 3 full hours. Don’t cheat! If you cut it too early, all that beautiful, spiced juice runs out onto your counter, leaving you with dry apples. Three hours allows the thickener to set up properly. Trust me on this one; this step makes or breaks the texture!
Tips for Success with Your apple pie recipe
Even with this straightforward apple pie recipe, simple tweaks can elevate it from good to legendary. Remember how I stressed Granny Smiths? They are firm, meaning fewer mushy bites! If you want a slightly sweeter pie, mix in a few Honeycrisp apples, but keep Granny Smiths as the foundation for that lovely tart backbone.
The biggest stress point is always the edges browning too soon. I keep a small square of aluminum foil nearby. Once the edges look deep golden—say, around the 40-minute mark—I use a pie shield or just loosely drape the foil over the rim. This shields the crust without steaming the top, letting the apples cook through beautifully. Also, remember that 3-hour cooling period? It’s non-negotiable for a perfect slice!
Making This apple pie recipe Ahead of Time
We all love baking, but sometimes life gets busy, especially when we’re juggling cooking for big events like Thanksgiving! Don’t let that stop you from enjoying this incredible fall baking recipes staple. The beauty of this double crust design is that all the components freeze and chill like champions. You don’t have to make this pie the morning it’s due!
The absolute best thing to do ahead of time is the crust. Remember those two disks we wrapped up? They need to chill for at least an hour before rolling, but honestly, they are better chilled overnight! If you skip the one-hour chill and go straight to rolling, the dough feels sticky. If you chill them for 24 hours, they firm up beautifully, and the butter stays perfectly hard, giving you maximum flakiness later on.
You can even assemble the whole pie a day ahead. Slather on that egg wash and sprinkle the coarse sugar, but don’t do that until about 30 minutes before it goes into the oven—you don’t want that crust sitting wet for too long. Cover the assembled pie loosely with plastic wrap and pop it in the fridge. When you’re ready, just add 10 extra minutes to the initial bake time since the dough starts colder than usual.
Freezing is easy too! Wrap those chilled, unbaked disks tightly in plastic, then foil, and toss them in the deep freeze for up to three months. When you’re ready to bake from frozen, add about 15 to 20 minutes to the total baking time. You might need to cover the edges with foil sooner since the baking process starts from frozen. It’s wonderful knowing you have a perfect crust ready to go!
Serving Suggestions for Your Classic apple pie recipe
Now that you’ve mastered the world’s best classic apple pie recipe, the only real question left is: what are you serving it with? Honestly, a slice this good barely needs anything, but in my house, we follow tradition!
You absolutely must have a scoop of good vanilla ice cream melting slowly down the side—it’s non-negotiable for achieving that perfect hot/cold contrast. If you want to lean into true American dessert classics, try serving a thin slice with a sharp slice of cheddar cheese alongside it. It sounds wild, but the saltiness of the cheddar just cuts through the rich sweetness of the buttery pie crust beautifully. Or, if you want something lighter, a dollop of fresh, lightly sweetened whipped cream does the trick!
Frequently Asked Questions About This apple pie recipe
I get so many emails and comments after people try this! I love hearing what everyone thinks. Here are the questions that pop up the most after folks try baking this version of the apple pie recipe. Hopefully, these little tips can save you some stress on baking day!
Can I use pre-made crust for this apple pie recipe?
Ugh, this is the eternal question, isn’t it? Look, I get it—sometimes you just need a shortcut, especially if you’re tackling this for Thanksgiving dessert recipes when the oven is already full! If you absolutely must use store-bought, go for it. However, you’re sacrificing the heart of this recipe: that crackly, buttery texture we worked so hard to achieve when we cut in the cold cubes. My whole pitch here is centered on that amazing crust, so if you use pre-made, you’re using *my* filling recipe, but it won’t be the full, authentic experience of a true from scratch apple pie!
My filling is runny. What went wrong with my apple pie recipe?
Oh, that is the absolute saddest outcome! A runny filling almost always comes down to one of two things, and neither of them happens during the mixing stage. First and most common: you cut into it before it had time to chill properly. Remember how I preached about that 3-hour cool-down period? That time allows the flour and starch in the filling to absorb all those juices and gel up. Patience, patience! If you cut it open too soon, it just flows everywhere.
The second, less common but possible, issue is that the amount of thickener (that 1 tablespoon of flour we added to the apples) wasn’t quite enough for the juiciness of your specific apples. If you used really watery apples instead of firm Granny Smiths, you might need an extra half-tablespoon of flour next time. But honestly, 90% of the time, it just needed more cooling time. Give it the full three hours on the counter!
Understanding the Nutrition in This apple pie recipe
I always feel like these nutrition facts are kind of a formality when you’re dealing with something as gloriously buttery and comforting as a homemade pie, but transparency is important! You know what you’re getting into when you choose to bake this, and hey, it’s full of fruit, right? Just know that since this recipe relies heavily on a full cup of butter for that amazing flakiness, the fat content is definitely on the higher side—and that’s what makes it taste so incredible!
Please keep in mind that these kitchen numbers are just solid estimates based on the ingredients listed in the recipe above, using standard ingredient densities. If you add extra sugar, use different apples, or use a lighter crust recipe, these numbers will shift!
- Serving Size: 1 slice
- Calories: About 450
- Fat: Around 25g (remember, a lot of this is the wonderful, high-quality butter we use for the crust!)
- Carbohydrates: Approximately 58g
- Protein: Roughly 5g
- Sugar: Estimated at 35g (this comes from the apples, brown sugar, and granulated sugar)
We’re giving you this information with full disclosure because, as trusted bakers, we believe you should know what you’re feeding your family. This pie is a treat, meant for savoring, especially after a big holiday meal. You won’t find a lower-calorie version of this apple pie recipe without compromising that spectacular, flaky texture!
Share Your Homemade apple pie recipe Experience
Now that you’ve pulled that golden, bubbly beauty out of the oven and successfully waited the three agonizing hours for it to set—I want to hear ALL about it! I put my heart and soul into making sure this apple pie recipe is the only one you’ll ever need, and knowing it worked for you is the best reward for me.
Did the crust live up to the flaky hype? Did those spices hit just right? Don’t keep the magic to yourself! Come on down to the comments section below and let me know how it went. I absolutely love reading your feedback and seeing what twists you put into your own version of this classic apple pie recipe.
If you snapped a picture of your perfect, lattice-topped masterpiece or how you served it with that scoop of melting ice cream, please tag me on social media! Seeing your bakes makes my whole week. Use the hashtag so I can find those gorgeous homemade apple pie creations!
Seriously, please take a minute and leave a rating—five stars if you loved it! It lets other bakers know this recipe is worth their time. Happy baking, and thank you for trusting me with your holiday table!
PrintClassic Homemade Apple Pie with Flaky Double Crust
A reliable recipe for a traditional American apple pie featuring a buttery, flaky crust and a sweet, cinnamon-spiced apple filling.
- Prep Time: 45 min
- Cook Time: 65 min
- Total Time: 110 min
- Yield: 8 servings
- Category: Dessert
- Method: Baking
- Cuisine: American
- Diet: Vegetarian
Ingredients
- 2 1/2 cups all-purpose flour
- 1 teaspoon salt
- 1 cup (2 sticks) unsalted butter, cold and cubed
- 1/2 cup ice water
- 6 medium Granny Smith apples, peeled, cored, and sliced 1/4 inch thick
- 1/2 cup granulated sugar
- 1/4 cup packed light brown sugar
- 1 tablespoon all-purpose flour
- 1 teaspoon ground cinnamon
- 1/4 teaspoon ground nutmeg
- 1/8 teaspoon ground allspice
- 1 tablespoon lemon juice
- 1 large egg, beaten (for egg wash)
- 1 tablespoon coarse sugar (for sprinkling)
Instructions
- Prepare the crust: In a large bowl, whisk together the flour and salt. Cut in the cold butter using a pastry blender or your fingers until the mixture resembles coarse crumbs with some pea-sized pieces of butter remaining.
- Gradually add the ice water, one tablespoon at a time, mixing until the dough just comes together. Do not overmix. Divide the dough in half, form each half into a disk, wrap in plastic, and chill for at least 1 hour.
- Prepare the filling: In a separate large bowl, gently toss the sliced apples with the granulated sugar, brown sugar, 1 tablespoon flour, cinnamon, nutmeg, allspice, and lemon juice until the apples are evenly coated.
- Preheat your oven to 425 degrees F (220 degrees C).
- On a lightly floured surface, roll out one dough disk into a 12-inch circle. Carefully transfer it to a standard 9-inch pie plate. Trim the edges, leaving a 1-inch overhang.
- Pour the apple filling into the bottom crust. Dot the top of the apples with small pieces of any remaining butter if desired.
- Roll out the second dough disk for the top crust. Place it over the filling. Trim the edges and crimp the top and bottom crusts together to seal. Cut several slits in the top crust to allow steam to escape.
- Brush the top crust lightly with the beaten egg wash and sprinkle with coarse sugar.
- Bake for 15 minutes at 425 degrees F. Then, reduce the oven temperature to 375 degrees F (190 degrees C) and continue baking for 40 to 50 minutes, or until the crust is golden brown and the filling is bubbly. If the edges brown too quickly, cover them loosely with foil.
- Cool the pie on a wire rack for at least 3 hours before slicing and serving.
Notes
- For the flakiest crust, keep all ingredients, especially the butter and water, very cold.
- If you prefer a lattice top, cut the top dough into strips and weave them over the filling instead of using a solid top crust.
- Use a mix of tart and sweet apples for the best flavor balance.
Nutrition
- Serving Size: 1 slice
- Calories: 450
- Sugar: 35g
- Sodium: 250mg
- Fat: 25g
- Saturated Fat: 15g
- Unsaturated Fat: 10g
- Trans Fat: 0g
- Carbohydrates: 58g
- Fiber: 3g
- Protein: 5g
- Cholesterol: 60mg