

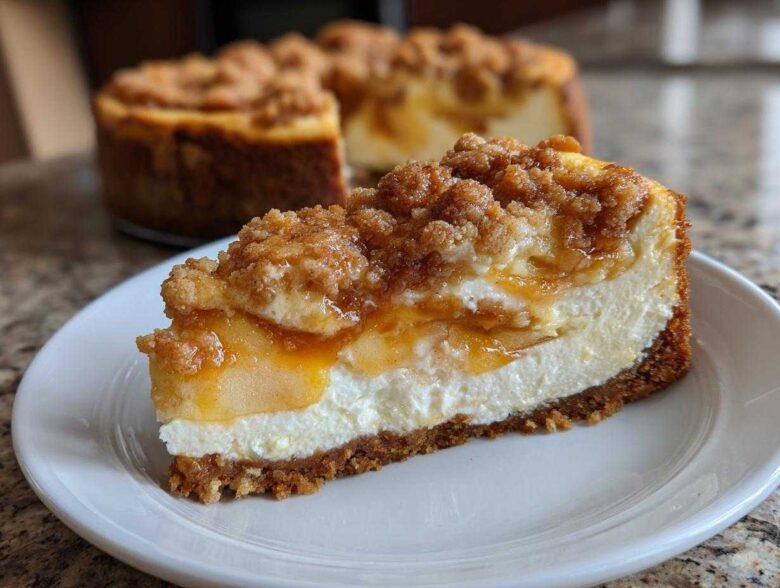
Oh my goodness, grab your apron! If you’ve ever stared at a slice of creamy, perfect cheesecake and then immediately craved a warm piece of grandma’s apple pie, stop what you are doing. I’ve cracked the code for you. Seriously, this apple pie cheesecake recipe is the dessert equivalent of an epic crossover movie—it’s rich, spiced, crunchy, and everything you want when the weather starts getting crisp!
My own journey to mastering this beautiful marriage of flavors took a few tries. Early on, I always ended up with a runny apple filling that sunk straight through the cheese layer. Too much liquid, always! But after testing batches while watching the leaves change color, I finally nailed that perfect structure. This Baked Apple Pie Cheesecake with Cinnamon Crumble isn’t just great for Fall; it’s the star of Friendsgiving and Christmas brunch, too. Trust me, I’ve been baking cheesecakes for years, and the secret sauce here is getting that texture contrast just right so you get that creamy, luxurious mouthfeel alongside the familiar spiced apples.
If you want to see how I’ve perfected the water bath technique to keep those tops smooth—no cracks allowed!—check out our dedication to baking knowledge over on a little page we put together about how we approach recipes here. Ready to dive into the most impressive (and deceptively easy!) fall baking you’ll do all season?
Why This Baked Apple Pie Cheesecake Recipe Works (The Best Apple Cheesecake)
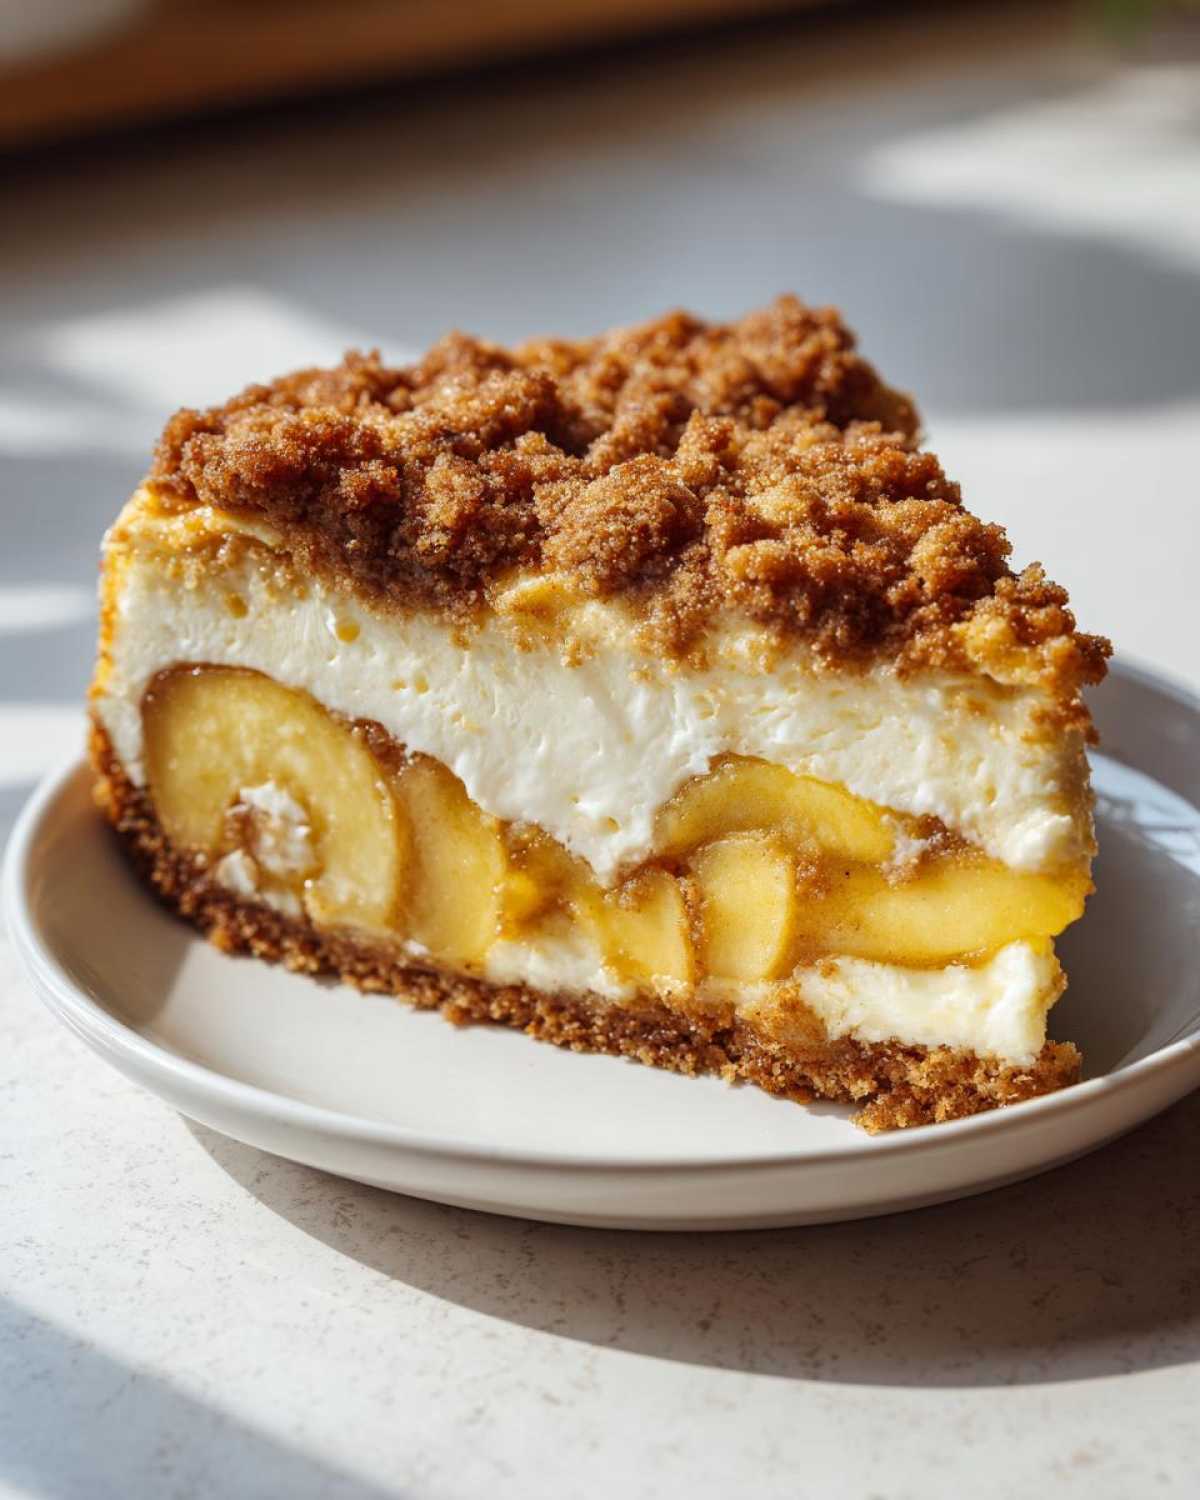
What makes this our go-to best apple cheesecake? Honestly, it’s the triple threat of texture. You get that dense, velvety smooth cheesecake, which is exactly what a proper bake should deliver. Then you hit the warm, spiced layer of apples. And just when you think you’re set, that cinnamon crumb topping gives you a fantastic, buttery crunch!
It’s all about achieving that perfect apple pie dessert fusion without turning into a soggy mess. We use Granny Smith apples specifically because they hold their shape while baking—no mush here! They keep that lovely tartness that cuts right through the richness of the cream cheese. That’s what turns this from just a dessert into a truly creamy apple dessert experience.
Perfecting the Apple Pie Dessert Fusion
The secret weapon for keeping everything beautiful and crack-free is the water bath. I know, I know, placing your springform pan inside another larger pan sounds overly fussy, but trust me on this one. Cheesecakes hate dry heat. The steam from the hot water keeps the temperature gentle and even around the sides. This slow, humid bake prevents the edges from setting too fast, which is what causes those heartbreaking surface cracks.
When you check on it, you’ll see the middle still jiggling a bit—that’s good! It’s essentially setting up its own creamy structure slowly. If you bake it until the center feels rock solid, you’ve baked it too long, I promise. It’s quality over speed when you’re aiming for gourmet results.
Gathering Ingredients for Your Apple Pie Cheesecake
Okay, let’s talk about what you need to pull off this amazing apple pie cheesecake recipe. You can’t just throw things in! We need supplies for four main areas: the graham cracker crust, the spiced apple filling, the creamy cheesecake base, and finally, that glorious crumble topping.
For the base, you’ll need your standard graham cracker crumbs and melted butter, plus those essential three 8-ounce packages of cream cheese—and please, make sure they are fully softened! The filling requires tart Granny Smith apples cooked down with brown sugar, cinnamon, and just a tiny whisper of nutmeg for depth. Lastly, the topping needs flour, more brown sugar, and cold butter cut into little chunks. It’s a team effort!
Ingredient Notes and Substitutions for Apple Pie Cheesecake
Listen up, because this is where cheesecakes go south quickly: Room temperature ingredients! Your cream cheese and those 4 large eggs absolutely must be brought to life on the counter before you even think about turning the mixer on. If they’re cold, you end up with batter lumps that just won’t forgive you. That’s the main rule for a smooth cheesecake with apple topping.
If you don’t have Granny Smiths, Honeycrisp or Braeburn work okay, but you might need an extra dash of lemon juice to keep the tartness balanced against the sweet filling. Also, if you suddenly run out of sour cream, you can substitute it with an equal amount of plain Greek yogurt. It’s a good backup for those days when you realize you’re missing one tiny thing but still need to bake today!
Step-by-Step Instructions for the Ultimate Apple Pie Cheesecake
Alright, this is where we bring all those beautiful ingredients together! Don’t let the layering scare you; we’re taking this slow and steady. First things first, get that oven preheating to 350°F (175°C). Then, wrap your 9-inch springform pan really well with a couple of layers of heavy-duty foil. Yes, heavy-duty! Water condensation is the enemy of a good crust, and this foil is your shield against leaks.
Start by mixing up your crust—graham crackers, a little sugar, and melted butter. Press it down firmly into that foil-wrapped pan, bake it for ten minutes just to set it, and then let it cool down for a minute while you deal with those apples.
In a small pot, cook your diced Granny Smiths with their brown sugar and spices until they soften up just a tiny bit—we want them tender, not totally cooked down. Set those warm little pockets of flavor aside for later. The next big job is the main filling. Beat that softened cream cheese until it’s truly silky, then slowly incorporate the sugar. Add your vanilla, then those four eggs, one by one, mixing just enough between each addition so you don’t whip in too much air—that’s a rookie mistake!
Always stir in your sour cream last by hand. Pour half of that incredible batter over your slightly cooled crust. Now, spoon your cooked apple mixture evenly across that first layer. You need to go easy here; don’t stack the apples too high or they’ll push through the top layer of batter later on. Pour the remaining batter gently over the apples.
Now for that crunchy finish! Mix up your flour, brown sugar, and the cold butter until it looks like coarse sand—use your fingertips for the best texture. Sprinkle this beautiful apple crumble cheesecake topping right over the top. It’s going directly onto the wet batter. See how that looks? It’s going to bake right into that gorgeous crust!
Assembling and Baking Your Apple Crumble Cheesecake
Here comes the trick that makes this a true gourmet cheesecake recipe: the water bath. Place your foil-wrapped springform pan inside a larger, sturdy roasting pan. Bring some water to a boil on the stove—this saves time and keeps your oven temperature more stable—and very carefully pour that steaming hot water into the roasting pan until it comes about halfway up the sides of your springform pan. It looks dramatic, but it’s non-negotiable for a crack-free top!
Bake this whole setup at 350°F for somewhere between 60 and 75 minutes. You’re looking for the edges to look set, but the very center should still have a little wobble, like Jell-O. It should look like it hasn’t quite decided to be firm yet. If you overbake it now, it’ll be dry later, and we absolutely can’t have dry cheesecake when we’re aiming for this level of quality.
The Critical Cooling Process for a Perfect Apple Pie Cheesecake
You MUST resist that oven door! The biggest mistake people make with any cheesecake, especially this apple pie cheesecake, is shocking it with cold air. Once the baking time is up, just turn the oven off completely. Prop the door open about an inch or two—I usually wedge a wooden spoon in there—and just let it sit inside the cooling oven for a full hour. This slow transition is key to retaining that perfect texture.
After that hour, take it out of the water bath, let it sit on the counter until it’s just room temperature, and then wrap it up tight. Now comes the hard part: chilling time. This dessert needs a long nap—at least six hours, but honestly, overnight is when it shines brightest. If you try to slice it warm or even slightly cool, it will collapse, and all that work goes to waste. Patience truly pays off with this decadent holiday cheesecake recipe.
You can check out our disclaimer if you have any questions about ingredient sources, but for now, just sit back and let that beauty chill! That long, slow chill time is what solidifies those creamy layers perfectly.
Tips for Success When Making Apple Pie Cheesecake
Okay, we’ve assembled the beauty, but I want to make sure your finished product is flawless. Since this is such a rich apple pie cheesecake, we need to be strategic about a few things that can always go wrong. If you follow these little tricks, you’ll avoid the three big dessert disasters: lumps, cracks, and soggy crusts!
First up: that soggy crust situation. When you press your graham cracker crumb mixture into the pan, pack it down tight, but be generous with it! After the initial 10-minute bake, I always let it cool completely before pouring the wet batter over it. You can even place the hot crust pan onto a cool marble surface for thirty seconds to hurry that cooling along. A totally cool crust acts like a barrier against moisture seeping up from the bottom during the long water bath bake.
Next, let’s talk cinnamon flavor in those apples. A lot of people just dump the spice in with the cooking apples, but you’re missing a step! For the absolute best creamy apple dessert flavor, take your ground cinnamon and lightly toast it in a completely dry skillet over medium heat for about 30 seconds before adding it to the apples, sugar, and nutmeg. You’ll smell it immediately—it wakes up the spice and makes the apple layer taste so much deeper. It’s a tiny move that yields major flavor!
Finally, regarding cracks: We talked about the water bath, but I need to stress the environment *after* baking. Never, ever move that cheesecake straight from a 350°F oven to a cool kitchen counter. That sudden temperature shock is what causes shrinkage and cracking. If you forget to prop the oven door open for that first hour of cooling, you might as well just say goodbye to a smooth top. Remember, slow cooling = smooth cheesecake. That’s the gold standard for easy fall baking, really!
Seasonal Inspiration: Variations on Your Apple Pie Cheesecake
While I truly believe this baked version with that incredible cinnamon crumble topping is the pinnacle of apple pie cheesecake, I know sometimes you need flexibility, especially with busy schedules around the holidays. This dessert lends itself so beautifully to variations, making it a staple among my favorite fall cheesecake ideas.
If you really want to go upscale for your Thanksgiving cheesecake desserts, you absolutely have to try adding salted caramel. After the cheesecake is fully baked and chilled, drizzle a homemade or good-quality salted caramel sauce right over the top before serving. It pairs shockingly well with the spiced apples—hello, caramel apple cheesecake dreams!
Another fun thing I do for big potlucks is skip the big springform pan and make mini cheesecakes loaded with the apple topping. They bake faster, they’re easier to serve, and everyone gets their own perfect topping-to-cheese ratio. It takes a little longer overall because of the assembly line involved, but they look so impressive on a dessert platter.
Exploring No Bake Apple Cheesecake Options
I hear you! Sometimes the thought of managing a water bath and baking time just isn’t in the cards, and that’s totally fair. If you’re leaning toward a no bake apple cheesecake, you can absolutely still get that great fusion flavor. The key is swapping out the filling entirely.
For a no-bake version, you’ll need to use a filling that sets up firm using gelatin or stabilizers like whipped cream cheese mixed with heavy whipping cream. You skip the eggs and the oven entirely! The best news, though, is that the delicious part—the warm, spiced apple topping—is actually even better slightly cooled when paired with a cold, light filling. So yes, you can make the apple component exactly as written in the main recipe, let it cool completely to room temperature, and then spoon it over your chilled, set no bake apple cheesecake base. It’s still that fantastic two in one dessert recipes experience!
Serving Suggestions for Your Two in One Dessert Recipes
Now that you’ve successfully navigated the water bath and waited what felt like twelve years for it to chill, it’s time for the fun part: dressing up this magnificent apple pie cheesecake!
Because this dessert is already so hearty—it’s got the crust, the creamy filling, the cooked apples, and the crumble all in one glorious bite—we don’t need a lot of fuss. Simple is always better here; we don’t want to mask that amazing texture you worked hard to achieve.
My absolute favorite way to serve it is just as it comes out of the fridge, maybe with a nice, sharp dusting of powdered sugar using a fine-mesh sieve. It gives it that beautiful, snowy look without adding much extra sweetness. If you want to check out some of the policies surrounding recipe testing and sourcing ingredients, you can click over to our Terms and Conditions page, but trust me, powdered sugar is all you need for a classic presentation.
However, if you want to lean into that decadent side, a dollop of freshly whipped heavy cream on the side of the plate is heavenly. The lightness of the cream cuts through the density of the cheesecake so nicely. It provides a cool, airy contrast to the spices in the apple layer, making every bite feel fresh.
And of course, if you happened to make that salted caramel variation we talked about, drizzle just a light spiral over the top of each individual slice right before serving. That combination of salty, sweet, warm spice, and cool cheese? It’s unbeatable. It really takes this **apple pie dessert fusion** up a notch for any holiday event!
Storage and Reheating for Leftover Apple Pie Cheesecake
Oh, the agony of having perfectly good apple pie cheesecake leftover! You’ve done all that work, and that thing is too good to waste. Luckily, this baked beauty is actually fantastic the next day, maybe even better once those spices have really melded together overnight. The main thing you need to know is that proper storage is super crucial for maintaining that creamy integrity.
For refrigeration, you’ll wrap it tightly. Once it’s fully chilled (and remember, we are talking at least six hours!), take it out of the springform pan bottom. Wrap the entire cake—or just the slices you plan to keep—in a double layer of plastic wrap. Make sure you press that plastic wrap right down onto the surface of the cheesecake, especially the crumble topping, to prevent any yucky fridge odors from migrating in. Stored this way, it’s good to go for about four to five days. It stays wonderfully rich and scoopable!
Now, if you need to make this ahead for a big party—and I highly recommend it, honestly—you can freeze it! This is how I handle my holiday cheesecake recipes ahead of time. You can freeze the whole thing or individual slices, which is way easier for serving smaller groups later. Just make sure it’s wrapped tightly, maybe even put the plastic-wrapped cake inside a large zip-top freezer bag for extra protection. It lasts beautifully in the freezer for about a month.
Thawing Your Apple Pie Dessert Fusion
The only tiny drawback to freezing these amazing two in one dessert recipes is the topping. When you thaw it, that lovely, crunchy cinnamon crumble topping will definitely soften up a bit—it turns almost cake-like, which isn’t the worst thing in the world, but it won’t have that initial sharp crunch. That’s just the moisture wicking back up into the flour mixture during the thaw.
To thaw, move the wrapped cheesecake to the refrigerator and let it defrost slowly overnight, maybe 10 to 12 hours. Don’t try to rush it on the counter! Once it’s completely thawed, you can unwrap it. If you really miss that crispness, here’s my quick tip: Once it’s thawed, sprinkle a fresh, thin layer of raw brown sugar and a tiny bit of cold butter crumb over the top and bake it uncovered at 350°F for just about 10 minutes. It won’t be the exact original crumble, but it brings back that great texture!
For reheating individual slices, I don’t recommend a microwave—it turns cheesecake rubbery fast. If you must warm it slightly (maybe you want to serve it closer to room temperature), just let the slice sit on the counter for about 30 minutes before serving. Honestly, though, this creamy apple dessert is absolutely best served cold!
Frequently Asked Questions About Apple Pie Cheesecake Recipe
It’s funny how many questions pop up once people sit down to bake the **best apple cheesecake**! You guys are clearly dedicated to making sure your apple pie cheesecake recipe turns out perfectly, which I totally love. Here are some of the biggest things I hear from bakers tackling this delicious cheesecake with apple topping for the first time.
Can I use fresh apples instead of Granny Smith?
That’s a big question! You technically can, but I really, really recommend Granny Smith for this specific bake. Why? Because this is a two in one dessert recipe that involves baking the apples inside the cheesecake batter. Granny Smiths are tart and firm; they stand up to the heat and the richness without turning into total mush or adding too much extra sugar. If you use a softer apple, say a McIntosh, you risk having it dissolve right into the creamy layer, and you lose that lovely texture contrast we’re aiming for.
How do I prevent my cheesecake with apple topping from sinking?
Sinking usually comes down to temperature shock or being underbaked, especially with a heavy topping like our crumble. First, and this is massive advice, follow our cooling instructions exactly! You have to cool it down slowly in the oven first, then on the counter, then chill it. Don’t take it straight from the oven to the fridge! If you feel like your apple layer is too wet, cook it down a bit longer in Step 3 until most of that liquid has reduced. A heavy, waterlogged fruit layer will weigh down the cheesecake as it sets, causing a dip in the middle.
Is this suitable for holiday cheesecake recipes?
Absolutely, this is my signature piece for holiday cheesecake recipes! It hits all the right notes: it’s warm, spicy from the cinnamon and nutmeg, and it looks incredibly impressive when you slice into it. It just screams cozy gathering. Because it needs to chill overnight anyway, it’s actually a fantastic recipe for making ahead of time, which is always a huge win when you’re hosting for Thanksgiving or Christmas. I find it’s a wonderful alternative to heavy pies for those big holiday spreads!
Can this recipe be adapted for a No Bake Apple Cheesecake?
You bet! We briefly touched on this in the variations section, but for those quick-baking lovers, yes! You need to switch to a proper no bake apple cheesecake base, which typically uses gelatin or cream cheese stabilized with whipped topping instead of eggs. Then, you would let this base chill until firm—check the no-bake recipe instructions for time—and then you spread your cooled apple filling and crumble over the top. Do NOT put the crumble on until the whole thing is fully chilled, or it will just sink right into the filling.
If you have any other burning questions about substitutions or timing, feel free to reach out on our contact page! Happy baking!
Understanding the Nutrition in This Apple Pie Cheesecake
Now, I know some of you out there are keeping track of what you eat, and I respect that! While this apple pie cheesecake is definitely an indulgence—it’s dessert, after all!—I wanted to give you a realistic snapshot of what you’re enjoying per slice. Remember, this is a truly generous slice because we’re talking about a huge, rich slice of decadent apple pie dessert fusion. These numbers are estimates, based on me using the standard ingredients for the recipe, so your mileage might vary depending on your butter brands or how heavy your hand is with that brown sugar!
We baked this beauty to be satisfying, so buckle up! Here is the estimated nutritional breakdown for one serving, based on 12 slices. You can check out the fine print on our privacy policy page to see exactly how we crunch these numbers if you’re curious, but generally, this is what you can expect from this fantastic seasonal cheesecake inspiration.
Here’s the quick rundown:
- Calories: Roughly 450 per slice. That’s getting up there, but you are getting cheesecake, spiced apples, AND crumble topping, so it makes sense!
- Fat: Around 28 grams. Most of that good stuff comes from the cream cheese and butter we use to get that luxurious texture.
- Carbohydrates: About 48 grams. That’s where the sugar and crackers come in, naturally.
- Protein: A modest 7 grams, largely thanks to the dairy in the filling.
See? Not bad for such an impressive bake! It’s all about balance. You’re getting a lot of rich flavor from these fats, which is what makes it feel so satisfying. Honestly, when I’m planning my menu for Thanksgiving cheesecake desserts, I count this as my decadent centerpiece that everyone will cheer for. Enjoy every bite!
Share Your Experience Making This Apple Pie Cheesecake
Whew! If you’ve made it this far, you are officially ready to bake the best apple pie cheesecake ever created. But my kitchen feels lonely without hearing from you! This is the part of the process where you send the recipe back out into the world.
Seriously, I want to see your creations! Tag me on social media with photos of your beautiful layered dessert. Did you manage to get that perfect, uncracked top thanks to the water bath? Did you try out the salted caramel swirl, or did you keep it classic?
The most important thing you can do for me, if you loved how this apple pie dessert fusion turned out, is to leave a rating right here on the page. Five stars if you think it deserves it! It helps other bakers who are hunting for the absolute best apple cheesecake find this recipe.
And if you decided to go the quick route and made the no bake apple cheesecake version instead, please let me know how that turned out for you! I’m always curious how people adapt things for their own kitchens. If you have questions about specific tools or ingredients after reading, check out our cookie policy page for some general site info, but otherwise, drop your comments below!
Happy eating, everyone. I’m already dreaming about the next time I get to cut into one of these beauties!
PrintBaked Apple Pie Cheesecake with Cinnamon Crumble
This recipe combines a creamy cheesecake base with spiced apple pie filling and a crunchy cinnamon crumble topping for a rich, two-in-one dessert.
- Prep Time: 30 min
- Cook Time: 75 min
- Total Time: 120 min
- Yield: 12 servings
- Category: Dessert
- Method: Baking
- Cuisine: American
- Diet: Vegetarian
Ingredients
- 1 1/2 cups graham cracker crumbs
- 1/4 cup granulated sugar (for crust)
- 6 tablespoons unsalted butter, melted
- 3 (8 ounce) packages cream cheese, softened
- 1 1/2 cups granulated sugar (for filling)
- 1 teaspoon vanilla extract
- 4 large eggs
- 1/4 cup sour cream
- 2 cups diced Granny Smith apples
- 1/2 cup brown sugar
- 1 teaspoon ground cinnamon
- 1/4 teaspoon ground nutmeg
- 1/2 cup all-purpose flour (for topping)
- 1/4 cup packed brown sugar (for topping)
- 1/4 cup cold unsalted butter, cut into small pieces (for topping)
Instructions
- Preheat your oven to 350°F (175°C). Wrap the outside of a 9-inch springform pan with heavy-duty aluminum foil.
- Prepare the crust: Mix graham cracker crumbs, 1/4 cup sugar, and 6 tablespoons melted butter. Press firmly into the bottom of the prepared pan. Bake for 10 minutes. Let cool slightly.
- Prepare the apple layer: In a small saucepan, combine diced apples, 1/2 cup brown sugar, cinnamon, and nutmeg. Cook over medium heat for 5-7 minutes until apples soften slightly. Set aside.
- Prepare the cheesecake filling: Beat the softened cream cheese and 1 1/2 cups sugar until smooth. Beat in vanilla extract, then add eggs one at a time, mixing just until combined after each addition. Stir in sour cream.
- Assemble the cheesecake: Pour half of the cheesecake batter over the crust. Spoon the cooked apple mixture evenly over the batter. Pour the remaining cheesecake batter over the apples.
- Prepare the crumble topping: In a small bowl, combine flour, 1/4 cup brown sugar, and 1/4 cup cold butter. Use your fingers to mix until coarse crumbs form. Sprinkle evenly over the top layer of batter.
- Bake: Place the foil-wrapped springform pan in a larger roasting pan. Carefully pour hot water into the roasting pan until it reaches halfway up the sides of the springform pan (water bath). Bake for 60-75 minutes, or until the edges are set and the center has a slight jiggle.
- Cool: Turn off the oven and let the cheesecake cool in the oven with the door ajar for 1 hour. Remove from the water bath, cool completely on a wire rack, then refrigerate for at least 6 hours or overnight before serving.
Notes
- For a richer flavor, substitute half of the sour cream with cream cheese.
- If you prefer a no-bake version, use a pre-made graham cracker crust and a no-bake cheesecake filling recipe, then top with cooled, spiced apples and a simple streusel topping made without baking.
- Chill the cheesecake completely for the cleanest slices.
Nutrition
- Serving Size: 1 slice
- Calories: 450
- Sugar: 45g
- Sodium: 300mg
- Fat: 28g
- Saturated Fat: 17g
- Unsaturated Fat: 11g
- Trans Fat: 0.5g
- Carbohydrates: 48g
- Fiber: 2g
- Protein: 7g
- Cholesterol: 110mg